Wanzor
Pet Care & Pet Shop Wordpress Theme
Thank you for purchasing Wanzor - Pet Care & Pet Shop
Wordpress Themes. If you have any questions that are beyond the scope of this help file, please
feel free to email, via my user page contact form or put a ticket at Support Center.
This guide provides instructions for installation, help on getting started and extensive documentation of features. It is recommended you read it thoroughly to fully leverage the Wanzor theme's capabilities. We hope you enjoy building with Wanzor as much as we enjoyed developing it and continue to develop with new features!
This guide provides instructions for installation, help on getting started and extensive documentation of features. It is recommended you read it thoroughly to fully leverage the Wanzor theme's capabilities. We hope you enjoy building with Wanzor as much as we enjoyed developing it and continue to develop with new features!
Theme Features
Easy Installation and Setup with demo content Import.
Easy Customization with Elementor and Customizer options.
Four Homepages Layout.
Fully Responsive Design.
Well Documented.
RTL Support.
Installation
1. Before beginning the installation and configuring of your new theme, you must first have
WordPress already installed on a server. Here is a very detailed guide that will walk you
through every step.
https://www.wpbeginner.com/how-to-install-wordpress/
2. After that, go to Dashboard > Appearance > Themes > Add News.
Next, click to Upload Theme and select downloaded Wanzor.zip wordpress theme and click install now.
Finaly, activate theme, by pressing "activate" button.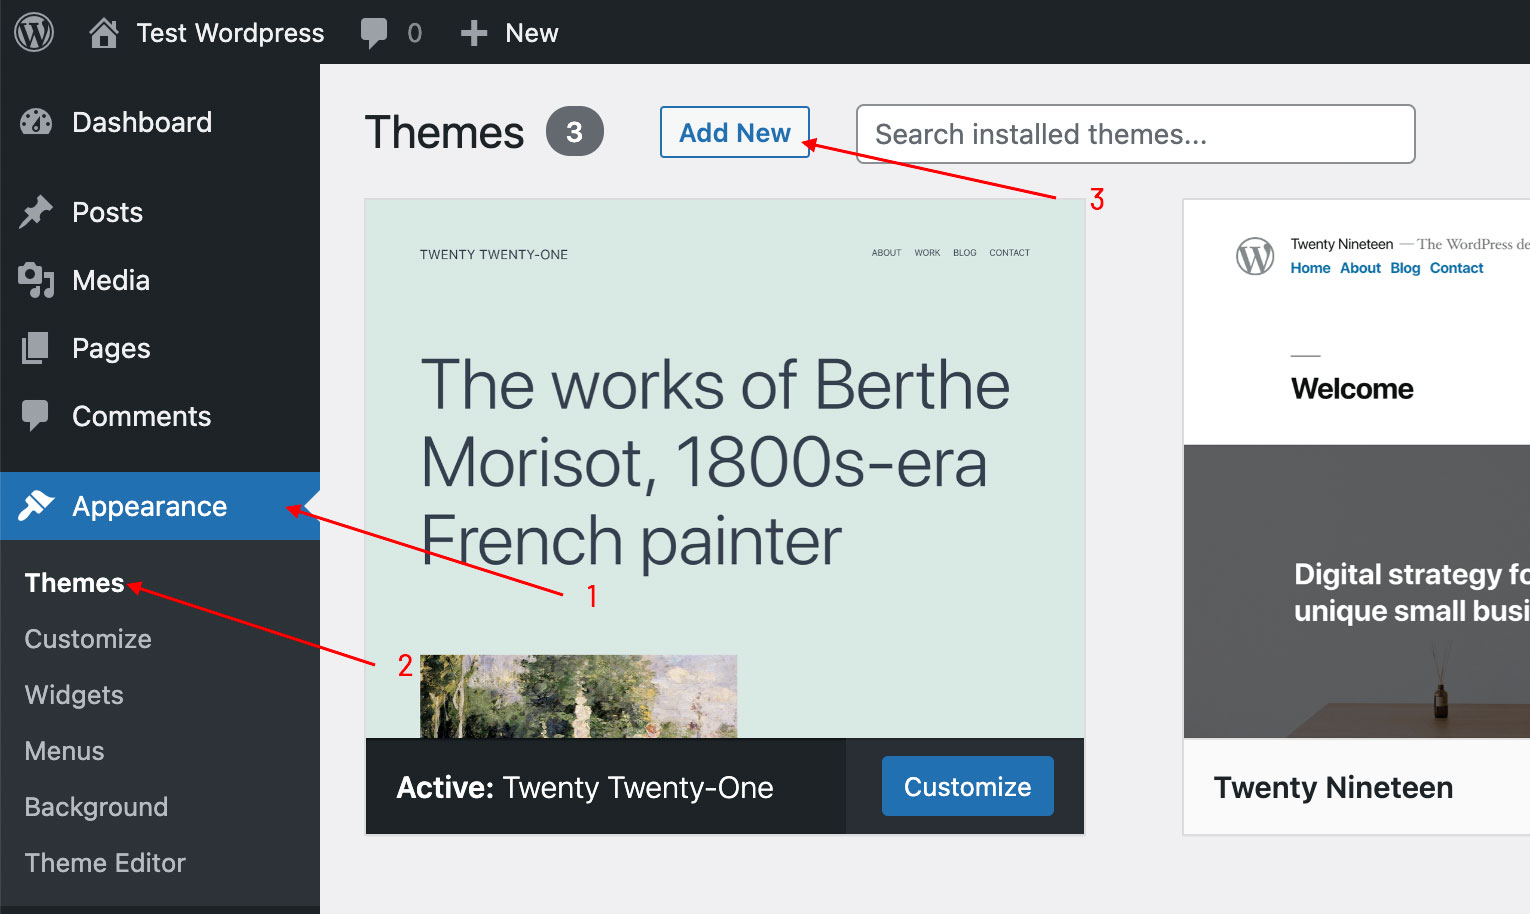 3. Then you will see a message with required plugin installation, press install plugins. Select
all checboxes and press install then activate plugins. Now your theme is installed correctly and
all plugins installed and activated.
3. Then you will see a message with required plugin installation, press install plugins. Select
all checboxes and press install then activate plugins. Now your theme is installed correctly and
all plugins installed and activated.
Plugins installation troubleshot info: If you can not install and activate all plugins at once, you need to install and activate plugins one by one, not all at once!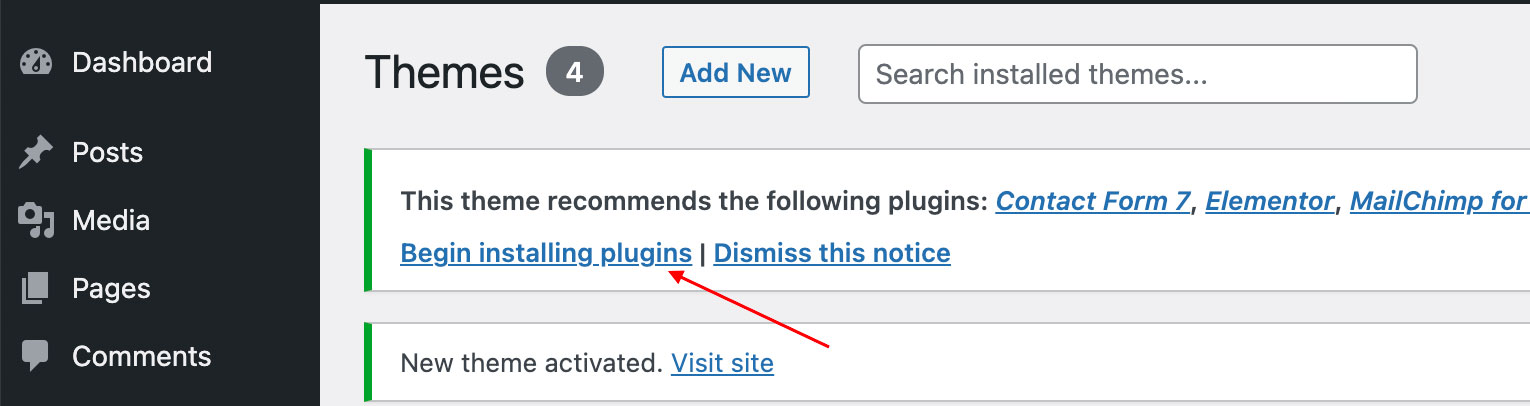 4. You can also install theme via FTP. Use free software for this task - FileZilla. Download theme files zip, unzip it and
upload theme folder to your server using ftp to location: wp-content > themes . Now new theme
will appear on your wp admin panel > appearance > themes > activate it, and do the same actions,
as we did above.
4. You can also install theme via FTP. Use free software for this task - FileZilla. Download theme files zip, unzip it and
upload theme folder to your server using ftp to location: wp-content > themes . Now new theme
will appear on your wp admin panel > appearance > themes > activate it, and do the same actions,
as we did above.
https://www.wpbeginner.com/how-to-install-wordpress/
2. After that, go to Dashboard > Appearance > Themes > Add News.
Next, click to Upload Theme and select downloaded Wanzor.zip wordpress theme and click install now.
Finaly, activate theme, by pressing "activate" button.
Plugins installation troubleshot info: If you can not install and activate all plugins at once, you need to install and activate plugins one by one, not all at once!
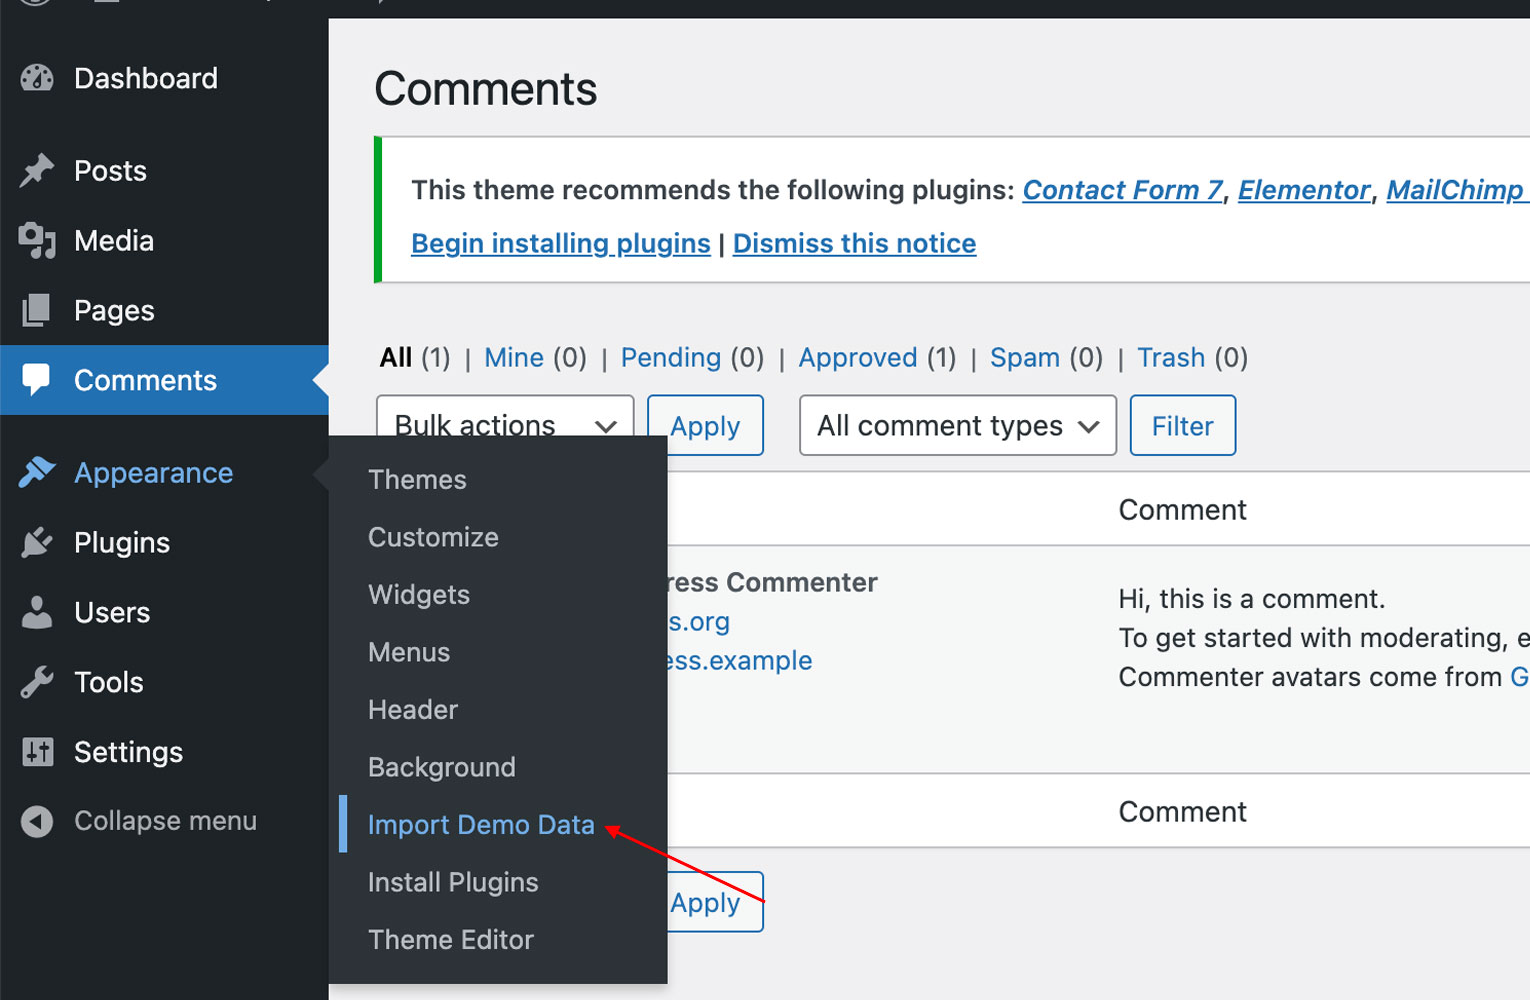
Demo Import
After theme installation you need to import demo data to have starting point for website
creation. With our themes it is very easy to do, just one click. Goto wp admin panel >
appearance > import demo data > and press the button. All your demo data will be
imported, this may take several minutes.
Installation & Demo Import Troubleshoots
If you have issues with theme installation or with importing demo data, there can be some kind
of reasons, based on your hosting or software configurations.
Main reasons list: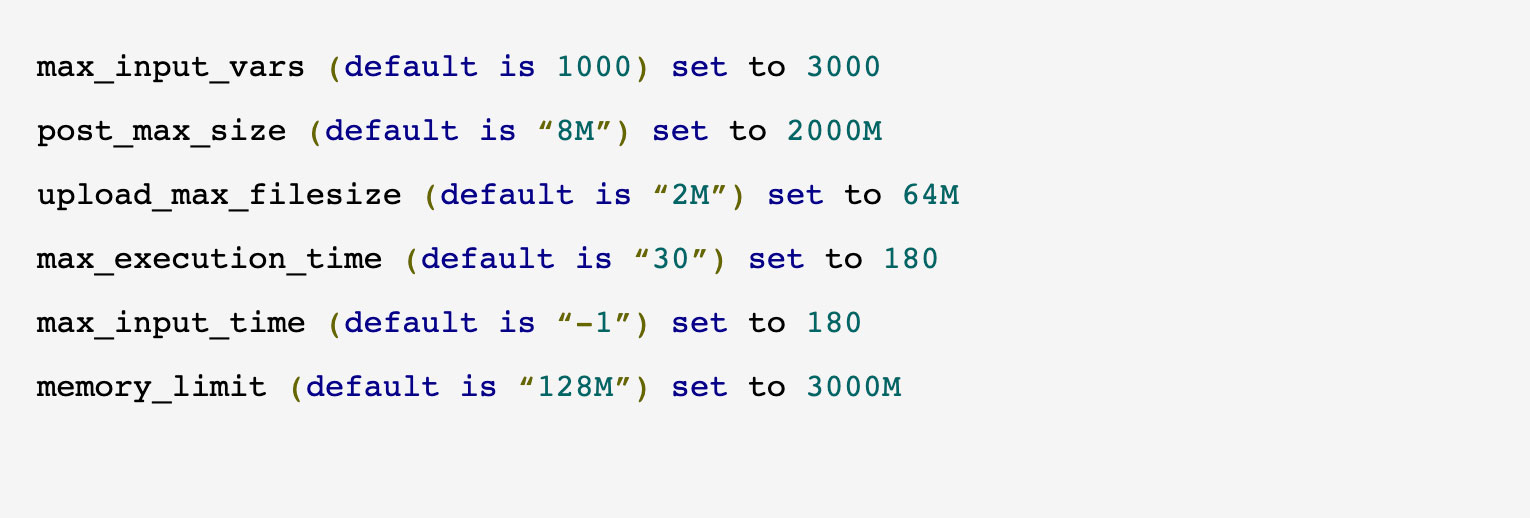 If you don’t have access to your php.ini file, ask your hosting/server provider, they should
configure it for you
If you don’t have access to your php.ini file, ask your hosting/server provider, they should
configure it for you
Main reasons list:
- Your WordPress should be upto date
- Your PHP version should be compatible with your WordPress version
- Your hosting memory limit and timeout limit should be enough to install theme and import demo data
Theme Options
The theme includes tons of easy to use options to customize the design of your site. Most of
your theme options can be found in the live WordPress theme customizer. Go to Appearance
> Customize to make changes to the design of your website. This is live customizer,
so all changes you can see at once, without saving, then when you like result, save.
Theses options commonly used for whole website, or specific page (blog, blog single, shop, product single, ...).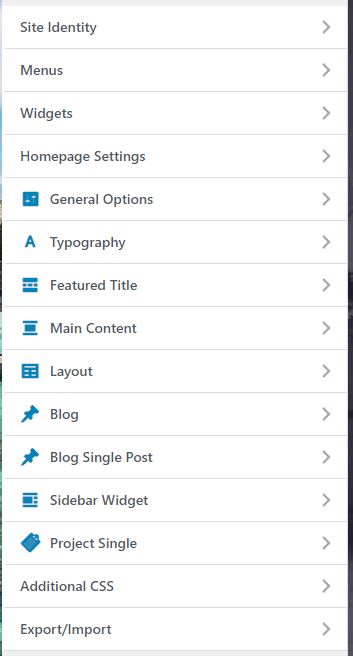
Theses options commonly used for whole website, or specific page (blog, blog single, shop, product single, ...).
Elementor Page Builder
1. You have powerful and flexible drag and drop tool Elementor page builder to create any
content you want. To learn how this plugins works, you need to examine their documentation: https://docs.elementor.com/
2. You can add any element you want with Elementor Page Builder, each element have it's own options inside and very easy to customize.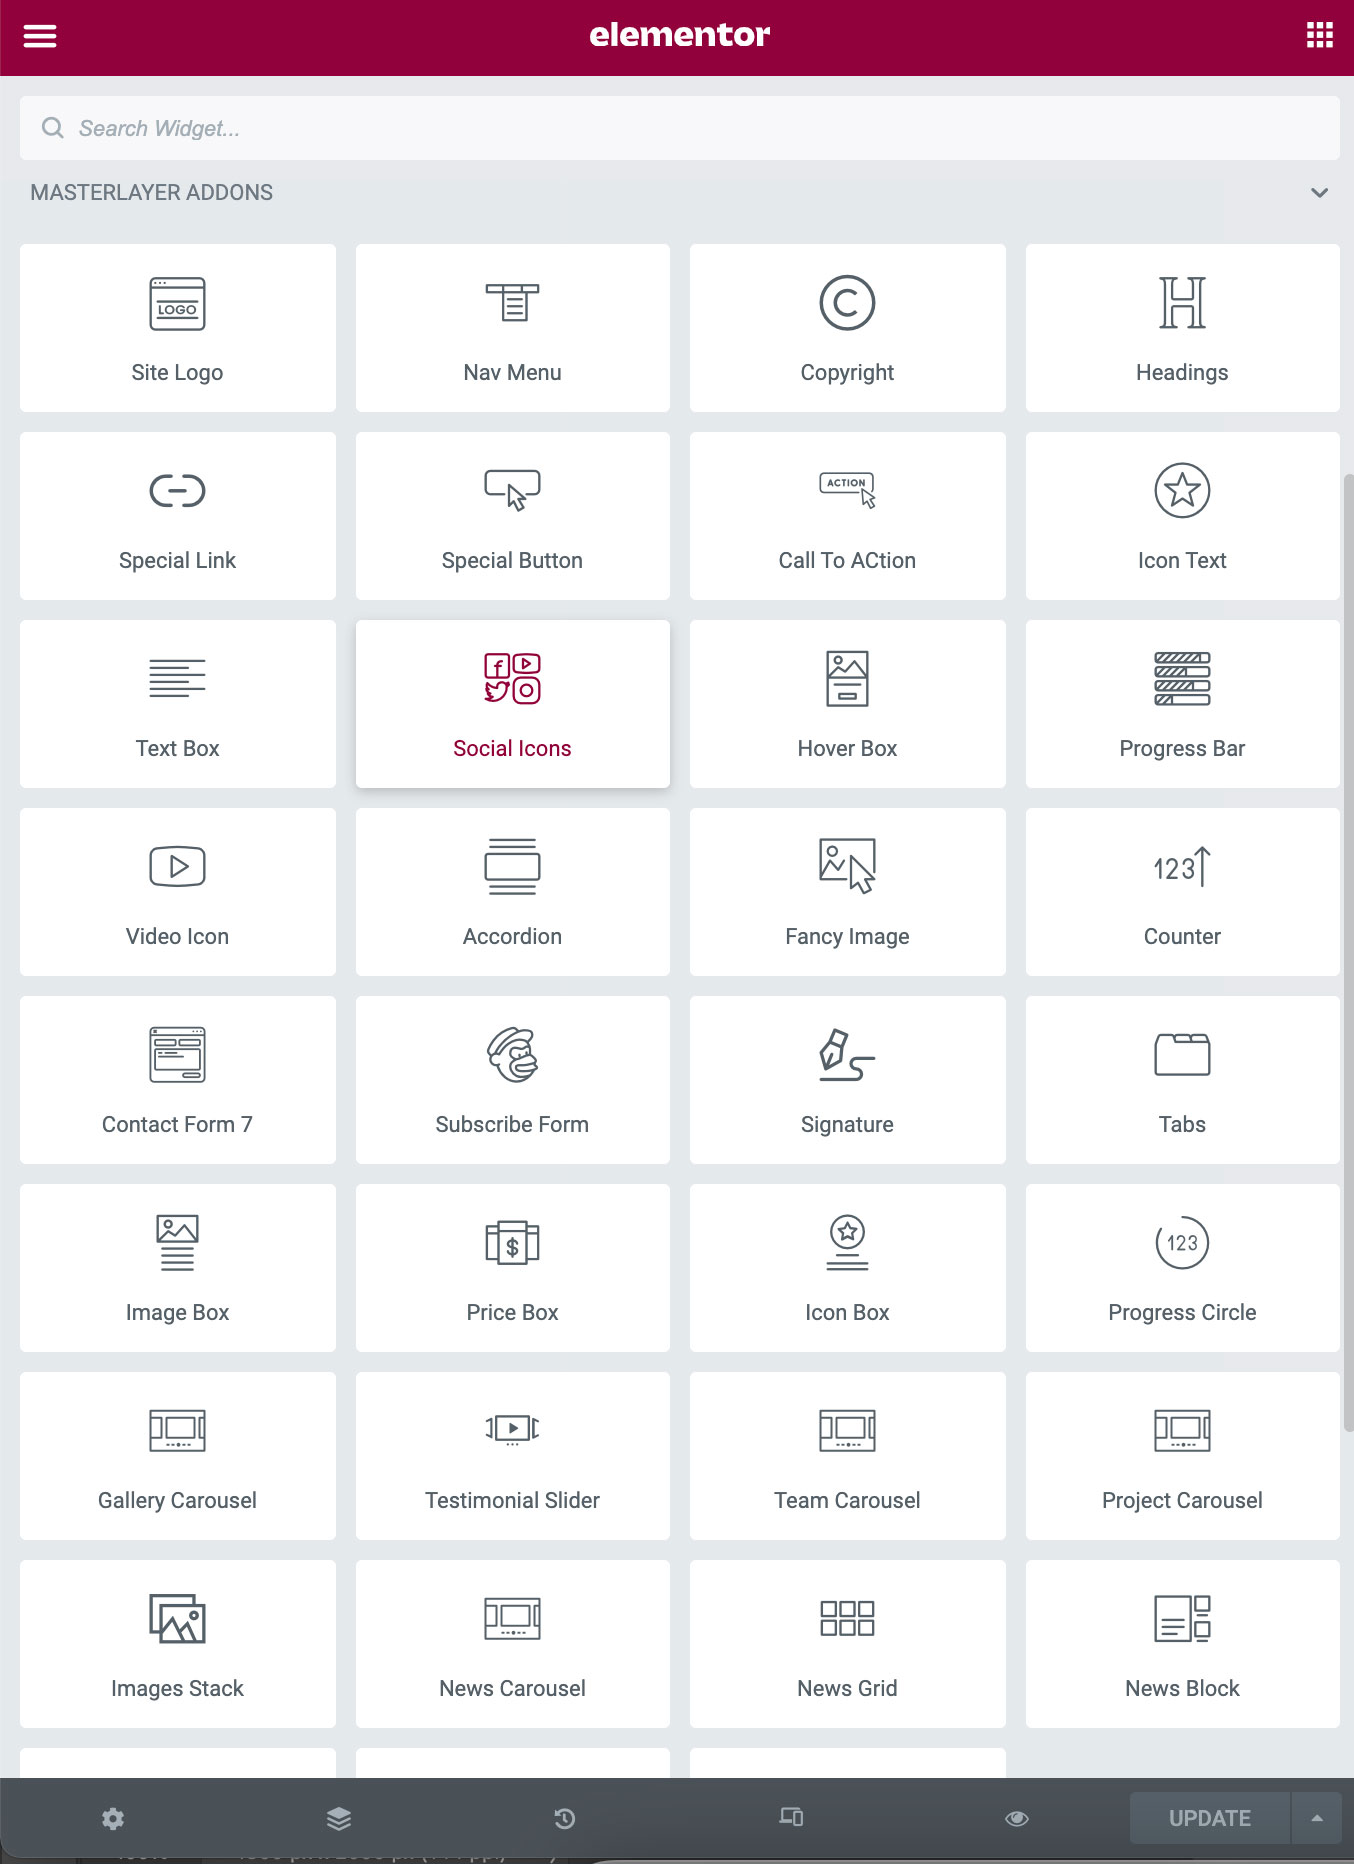 3. When editing single page by Elementor Page Builder, in left bottom area you can find page
extended options icon, there you will find all options that you can set for that page.
3. When editing single page by Elementor Page Builder, in left bottom area you can find page
extended options icon, there you will find all options that you can set for that page.
Note: If you don't see these options, please update and refresh page. Most options are live customizer, but some you need update and refresh page to view change.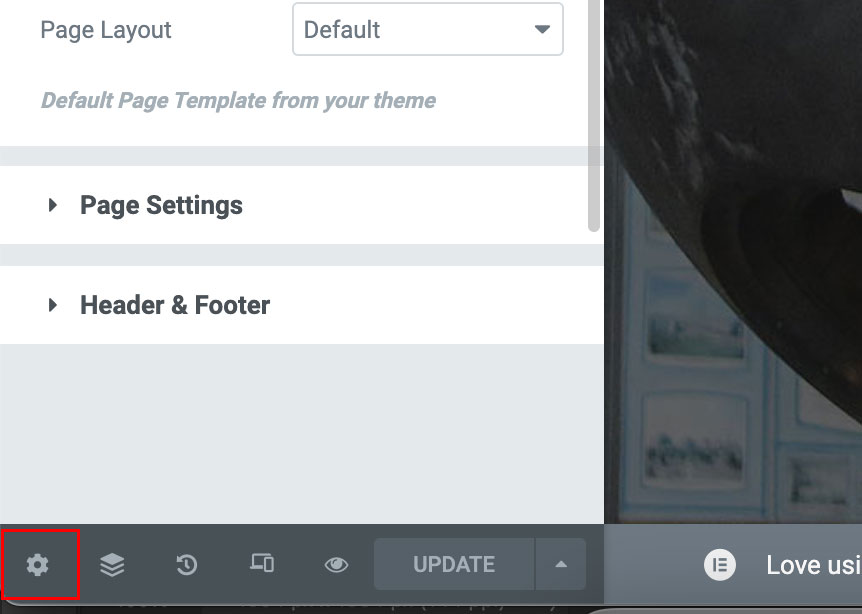
2. You can add any element you want with Elementor Page Builder, each element have it's own options inside and very easy to customize.
Note: If you don't see these options, please update and refresh page. Most options are live customizer, but some you need update and refresh page to view change.
Theme Color
Theme have option to change almost all colors inside. Some elements use global colors, some
elements have it's own color choose option. There are most used placed from where you will be
able to change colors in theme:
1. To change global colors in theme, edit a page with Elementor. Click on hamburger menu on top
left. Choose Site Settings > Global Colors.
 2. Some elements in theme can have it's own separate accent color that can be set from Elementor
page builder element options.
2. Some elements in theme can have it's own separate accent color that can be set from Elementor
page builder element options.
3. Also you can see in page extended options some options to set colors for each page separately. Note: if you used Wanzor Accent color for an element, but the color didn't change. Make sure you clear the Accent Color in Page Settings.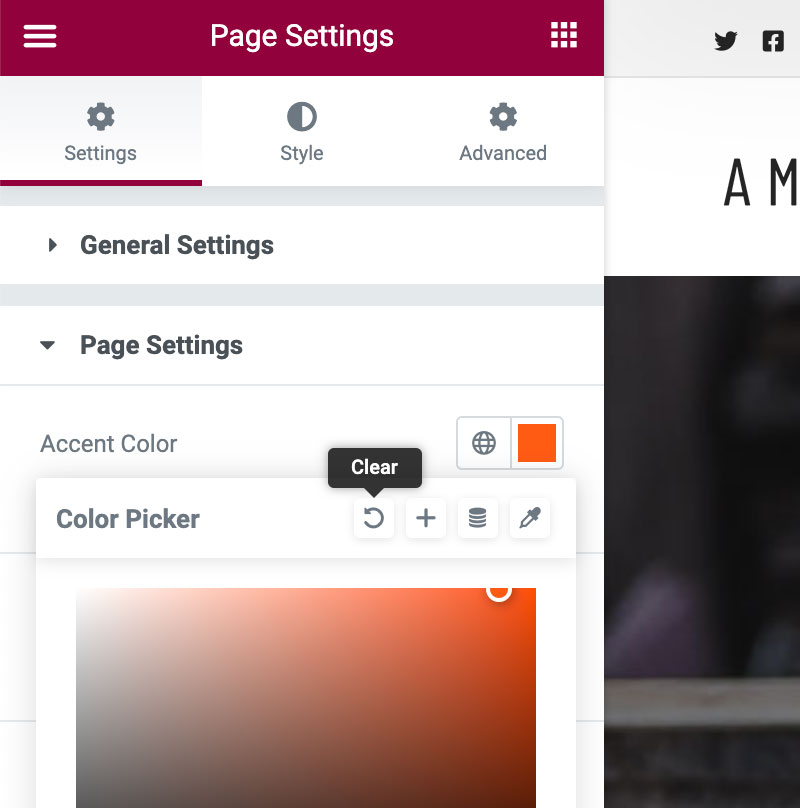 4. If you need to change color in some place, where you can not find option to change colors,
you can always use custom css styling with pointing to the element class where you want to
change color. Custom css can be applied to wp admin pannel > appearance > customize >
aditional css
4. If you need to change color in some place, where you can not find option to change colors,
you can always use custom css styling with pointing to the element class where you want to
change color. Custom css can be applied to wp admin pannel > appearance > customize >
aditional css
- Wanzor Primary are used for Headings.
- Wanzor Text are used for Paragraphs.
- Wanzor Accent are used for Link, Button Background, Icon ...
3. Also you can see in page extended options some options to set colors for each page separately. Note: if you used Wanzor Accent color for an element, but the color didn't change. Make sure you clear the Accent Color in Page Settings.
Working With Menus
1. Creating menus. To create or edit existing menu you need to goto wp admin
panel > appearance > menus. There you will see options to create menus, create menu items,
manage menu locations.
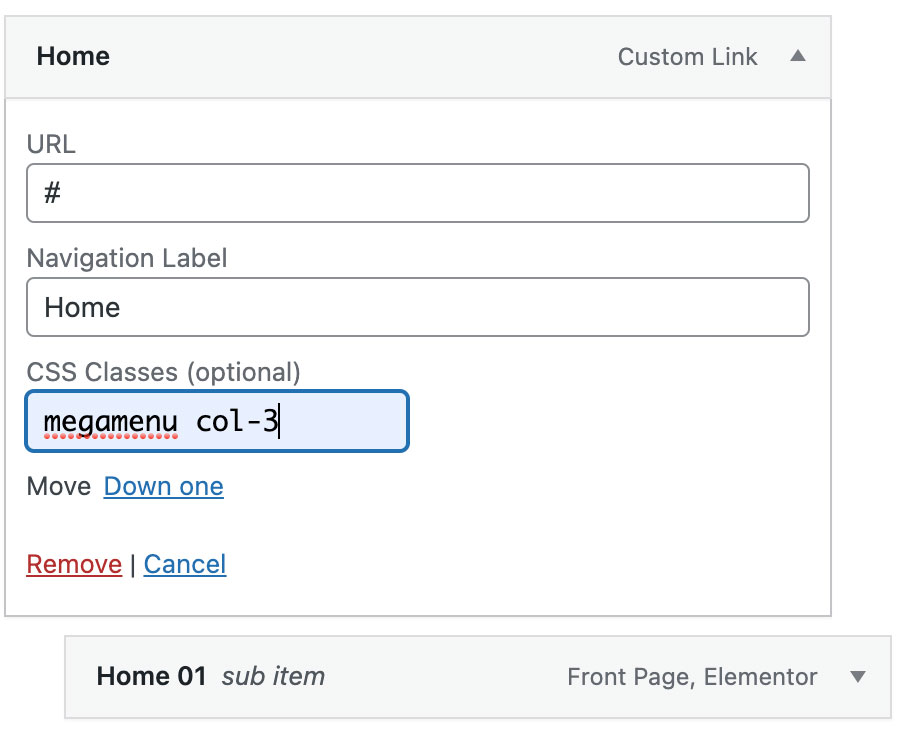
2. Adding pages to your menu. To add page to menu simple choose the menu you want to work with, then in left part you will see pages, links, posts, and much other things to add to menu, select the item you want to add to menu. After adding item to menu you can drag and drop your menu items to organize menu the way you want. Note that some options are not visible, so enable all options for menus, you can check it in screen options in the top of your screen.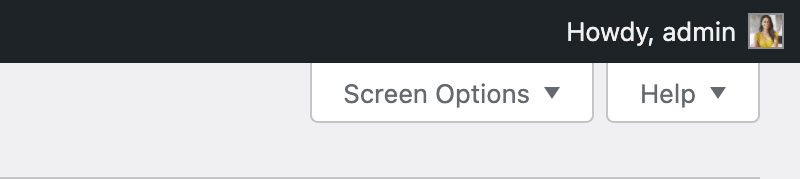 3. Working with megamenus. To set megamemu for your menu item, you need to
enable "css styling" checkbox in "screen options". Then simply add class with "megamenu col-4"
to make simple menu to megamenu, you also need to have menu items inside that megamenu to make
it work. You can also change column number in css class.
3. Working with megamenus. To set megamemu for your menu item, you need to
enable "css styling" checkbox in "screen options". Then simply add class with "megamenu col-4"
to make simple menu to megamenu, you also need to have menu items inside that megamenu to make
it work. You can also change column number in css class.
 4. If you need to change color in some place, where you can not find option to change colors,
you can always use custom css styling with pointing to the element class where you want to
change color. Custom css can be applied to wp admin pannel > appearance > customize >
aditional css
4. If you need to change color in some place, where you can not find option to change colors,
you can always use custom css styling with pointing to the element class where you want to
change color. Custom css can be applied to wp admin pannel > appearance > customize >
aditional css
2. Adding pages to your menu. To add page to menu simple choose the menu you want to work with, then in left part you will see pages, links, posts, and much other things to add to menu, select the item you want to add to menu. After adding item to menu you can drag and drop your menu items to organize menu the way you want. Note that some options are not visible, so enable all options for menus, you can check it in screen options in the top of your screen.
Header & Footer
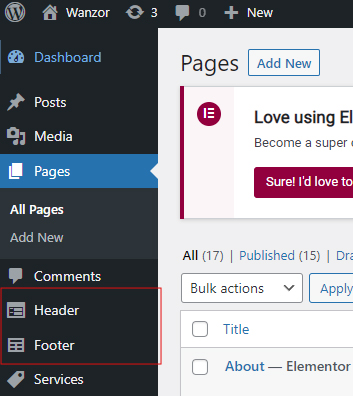
1. Header & Footer Builder with Elementor.When import the demo, you already have all versions of Header & Footer
we built for theme. Goto wp admin panel > Wanzor Header. "Edit" existing
versions or click "Add New" to create new Header.
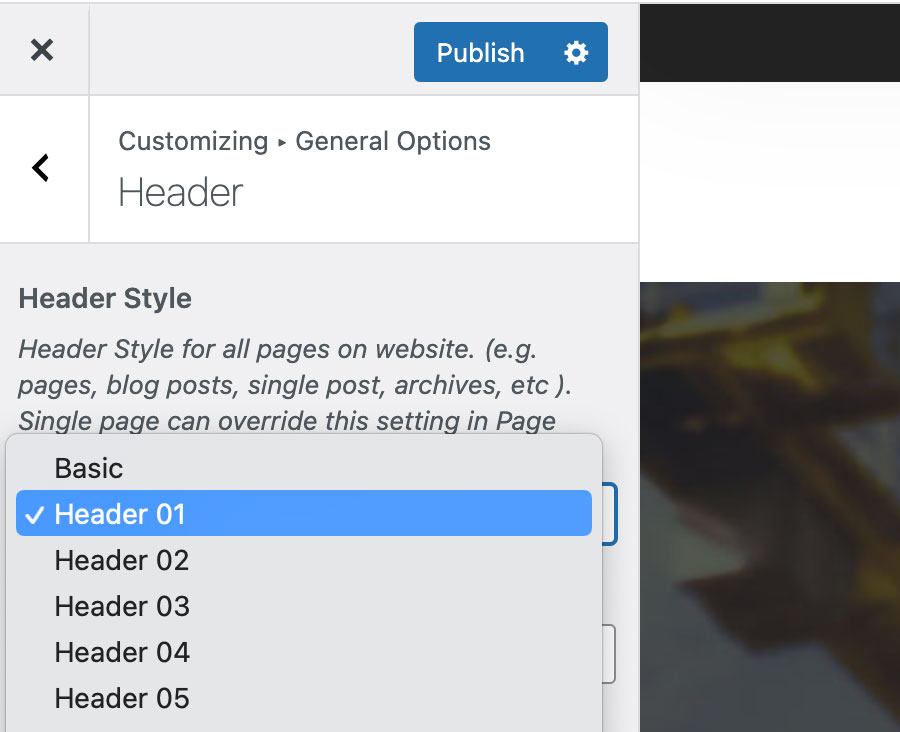
 2. Header & Footer in Customize. goto wp admin panel > Appearance >
Customize > General Options > Header . Here you can choose the Header version for
all whole website.
2. Header & Footer in Customize. goto wp admin panel > Appearance >
Customize > General Options > Header . Here you can choose the Header version for
all whole website.
 3. Header & Footer in Elementor Page Settings. to change Header version for
single Page, edit it with Elementor, go to Page Settings > Header & Footer and
choose the version you want for this page.
3. Header & Footer in Elementor Page Settings. to change Header version for
single Page, edit it with Elementor, go to Page Settings > Header & Footer and
choose the version you want for this page.
Contact Form 7
1. Make sure that you installed Contact form 7 plugin. After installing this plugin you can
create contact forms. Goto wp admin panel > Contact > Add New
2. Give a Name to your form and change Mail Info
3. Now you can create contact forms, by adding different form element
4. More information abouyt contact form 7 you can find on plugin documentation https://contactform7.com/docs/
2. Give a Name to your form and change Mail Info
3. Now you can create contact forms, by adding different form element
4. More information abouyt contact form 7 you can find on plugin documentation https://contactform7.com/docs/
Mailchimp
1. Theme is compatible with "Mailchimp for wordpress" plugin. To make it working you need to
place valid API key to wp admin panel > mailchimp for WordPress > API key
form.
2. To get API key you need to have registered mailchimp account, login to your account, then goto https://admin.mailchimp.com/account/api and there you will be able to create your API key, copy it, paste to WordPress.
3. Goto wp admin panel > mailchimp for WordPress > form > settings > and make sure that you assigned correct mailing list with enabling checkbox in "Lists this form subscribes to" section.
4. Now you can place your subscribe form anywhere you want as Elementor page builder element.
Theme Translation
1. You need to download and install poEdit program from here https://poedit.net/download
2. Then goto ftp > wp-conetent > themes > your theme folder > languages. There you will find .pot file, open it with poEdit
3. After edititng you need to set correct files name for your new files that will come after editing. More info about files naming you gan find here: https://poedit.net/download
4. You need to save .po and .mo files in this format. Exmaple: "en_US.po"
5. Theme addons plugin is also translation ready, but plugin translation files should be saved in this format. Example: "masterlayer-en_US.po"
6. Open file wp-config.php in your Wordpress root folder and add the line define('WPLANG', ''); remember replace '' by the language you want. More details can be found here: WordPress in your language
7. You can also translate theme using Logo Translate plugin: https://wordpress.org/plugins/loco-translate/ 8. Theme is fully compatibele with WPML Multilingual plugin, that can be used for translation and multilingual: WPML.org
FAQs
This section is about frequently asked questions
2. Unzip theme zip file as well, then goto wp-content > themes in your ftp and replace theme old folder with new one, by replacing all files as well
3. Now you need to update all included plugins. Goto "plugins" folder in your theme pack, then unzip all zip files inside that folder, in result you will have plugins folders. Goto wp-content > plugins > and replace each folder of plugin with new folder, by replacing all files inside folder
A child theme is a theme that inherits the functionality of another theme, called the parent theme. Child themes allow you to modify, or add to the functionality of that parent theme. A child theme is the best, safest, and easiest way to modify an existing theme, whether you want to make a few tiny changes or extensive changes. Instead of modifying the theme files directly, you can create a child theme and override within.
Why to use a Child Theme?
if you modify an existing theme and it is updated, your changes will be lost. With a child theme, you can update the parent theme (which might be important for security or functionality) and still keep your changes. It’s a great way to get started if you are just learning WordPress theme development.
How to create Create child ?
Follow documentation about child theme creation: Child Theme Dev
You can also use this plugin for easy child theme creation: One Click Child Theme
1. Goto WP Dashboard > Setting > General, select the preferred "Site language" - don't forget to click the “Save Changes” button.
2. Goto WP Dashboard > Elementor > Tools, click Regenerate CSS & Data and Save Changes to reload CSS for RTL.
3. Now your website is displayed in RTL, you can start to build pages. If you edit a demo page, you need to manually configure some elements cause they have some properties that can not change automatically.
If you have any questions, please feel free to email, via my user page contact form or put a ticket at Support Center. I will happy to help.
How to update theme via ftp
1. Download latest version of theme ( full pack ). Unzip it and inside you will see theme zip file "plugins" folder and others.2. Unzip theme zip file as well, then goto wp-content > themes in your ftp and replace theme old folder with new one, by replacing all files as well
3. Now you need to update all included plugins. Goto "plugins" folder in your theme pack, then unzip all zip files inside that folder, in result you will have plugins folders. Goto wp-content > plugins > and replace each folder of plugin with new folder, by replacing all files inside folder
How to create child theme
What is child theme ?A child theme is a theme that inherits the functionality of another theme, called the parent theme. Child themes allow you to modify, or add to the functionality of that parent theme. A child theme is the best, safest, and easiest way to modify an existing theme, whether you want to make a few tiny changes or extensive changes. Instead of modifying the theme files directly, you can create a child theme and override within.
Why to use a Child Theme?
if you modify an existing theme and it is updated, your changes will be lost. With a child theme, you can update the parent theme (which might be important for security or functionality) and still keep your changes. It’s a great way to get started if you are just learning WordPress theme development.
How to create Create child ?
Follow documentation about child theme creation: Child Theme Dev
You can also use this plugin for easy child theme creation: One Click Child Theme
Does Wanzor Support RTL?
Yes, Wanzor theme support RTL. Please follow these instructions.1. Goto WP Dashboard > Setting > General, select the preferred "Site language" - don't forget to click the “Save Changes” button.
2. Goto WP Dashboard > Elementor > Tools, click Regenerate CSS & Data and Save Changes to reload CSS for RTL.
3. Now your website is displayed in RTL, you can start to build pages. If you edit a demo page, you need to manually configure some elements cause they have some properties that can not change automatically.
If you have any questions, please feel free to email, via my user page contact form or put a ticket at Support Center. I will happy to help.